Marker Tutorial pt.3
Marker Tutorial pt.3
Marker Tutorial pt.3 by Amadeus
Description
Description

Okay here¡Çs the last part of the tutorial the clothing cause after all we can¡Çt just leave it like it was ^_^.
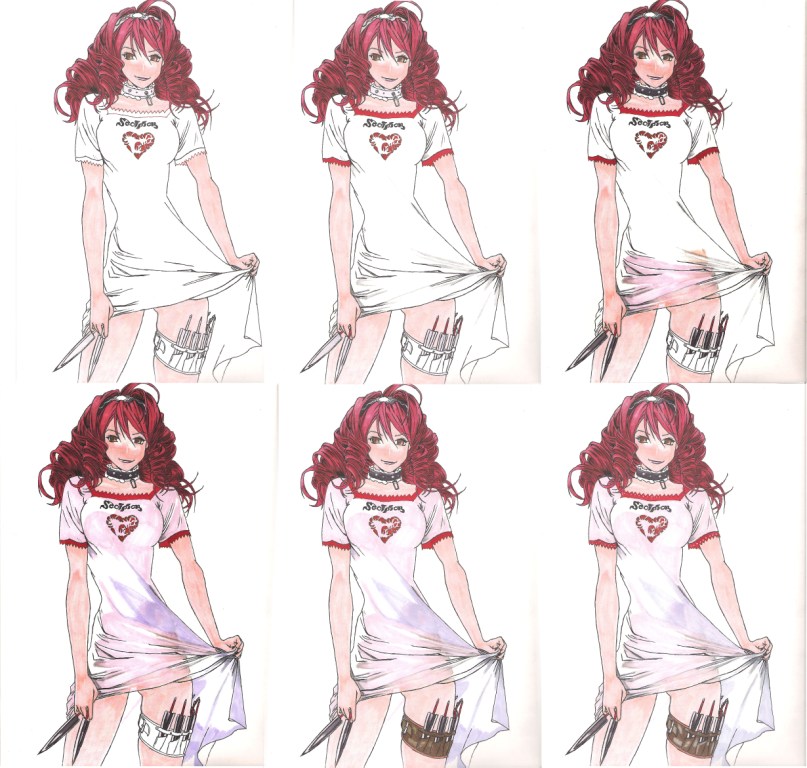
Anyways first, I started to apply the base color for the knives, collar and headband I used #101 Warm Grey 30%. I also used #4 Crimson Red for the knife handles and the trim on her dress while using a pencil to shade in some shadows on the dress as you can see in pic 2.
Then to give her dress the effect of some kind of transparency I once again used the dried out #12-Light Peach then began to go over that with #133-Deco Pink. All while continuing to add darker and darker tones of Warm Grey before ending with #107-Warm Grey 90%.
After applying all the Deco Pink, I applied a layer of #144-Cloud Blue
Next, I colored in the leg belt by using #65-Sienna Brown for the trim and #¡Çs 62-Sepia and 88-Dark Brown for the main part
Once all that was done I colored the dress with the white colored pencil and used the white pen to add the detail on the trim of her dress.
That concludes' this tutorial and remember this is only how I do it so for all I know I¡Çm doing it all wrong, but it works for me. Final pic shall be posted for better scrutiny when I finish the background. If you'd like to try coloring this pic yourself using this tutorial as a reference you can just print out the lineart and have a go at it ^_^
General Info
General Info
Ratings
Category Tutorials » Technique/Media Tutorials
Date Submitted
Views 2888
Favorites... 1
Vote Score 1
Category Tutorials » Technique/Media Tutorials
Date Submitted
Views 2888
Favorites... 1
Vote Score 1
Comments
6
Media Unspecified
Time Taken
Reference
Media Unspecified
Time Taken
Reference
Comments
You are not authorized to comment here. Your must be registered and logged in to comment
StrawberryPockyFan on April 21, 2007, 4:46:25 PM
 very awesome tutorial ^_^. i really suck at markers, so this will help a lot
KenshinJennings on March 1, 2006, 5:35:25 AM
 I'm debating whetherPrisma and Copic are better,because,I've heard Prisma are good,but usually the professional artists use Copic.And Copic is expensive...Oh well,I'm never going to buy markers,but you explained clearly.I'd like to know how much Prisma usually are.For now i'll stick to good ol' Photoshop,sometimes Corel,perhaps Open Canvas one day...and colored pencils and/or regular pencils now and then.
StrawberryPockyFan on April 19, 2007, 8:06:01 AM
the last time i checked prismacolor markers were over $2 a pop. they're not much cheaper, but they're goodAmadeus on April 19, 2007, 3:25:07 PM
Amadeus on
Yeah I spend about $2 a marker, but they last for a pretty good time. IMO Copic has certain things that make them different from Prismacolor but neither one is really superior if you take a little time to figure out how to use them. I just got Prismacolor mainly do to the availabilty of them over Copics.SpasticPenguine on January 21, 2006, 12:47:54 PM
 Thank you so much for making this tutorial- I'm totally new to PRISMA colored markers, but there such a beautiful medium and I wish to learn more about it. This will really help, I'll have to use this and practice tomorrow :D *favs artist*
AnimeMangaLover on January 21, 2006, 3:04:38 AM
 Ah, I love you! ^^ So, to blend the colors, you use a white colored pencil? Anyways, this is really cool. I love the final result. *Grabs markers* Now let me give it a try! ^^