COPIC.....(Just a brief explanation)
COPIC.....(Just a brief explanation)
COPIC.....(Just a brief explanation) by Len
Description
Description
*Update (14-02-2005: The paper used for the example above is common cartridge paper. If you are using paper specially made for alcohol-based markers, that would be a somewhat different story.*
Okiee....as requested by Darkraven, here's just a brief explanation on colouring with COPIC...(I won't call this a good tutorial....) For those who had used COPIC before, you can just press back and look at some other stuff....;3 By the way, for those new to Copic, I suggest that you try out the markers first BEFORE reading the following. It'll help even more. ;)
*Everything said here might not be entirely correct, so feel free to drop a comment and correct me. ^^ And I can never garuantee that you'll be colouring like CLAMP or Arina Tanemura after reading this, because everything depends on you and your efforts also!! These are just guidelines.*
introducing copic:
It is an alcohol based marker, so the ink dries up pretty fast after it is applied. (Zzzzzz.....) If you want to get an even coat, you have to colour before the ink dries up.
(Tip: Use the brush nib and colour the entire patch with just a stroke. It sort of prevents some blotches, but don't colour it too fast, or some uneven shades or edges will appear, especially when your marker is running low on ink. If the area you wanna colour is very big, then that'll be another story. XD)
Buying and choosing
When I first started off, I didn't know which colour to choose (because there are so many!!) so I grabbed a few colours which I found eye-catching and nice. Somehow, I had trouble using them later because they don't match and blend with the other colours. In fact, I seldom use them. The ones that I really use are those that are pale and lighter in shades. (eg: warm gray no.1, powder blue) They are the ones which I often need refills for and the ones which blend the darker colours together. (But without the darker colours and midtones, I can't blend them together...)
So now, I buy 3 markers at a time. These 3 are from the same colour group, one is darker, one is the lighter colour and one is in between the other 2 colours (which I call the midtone).
[Refer to 1st diagram]
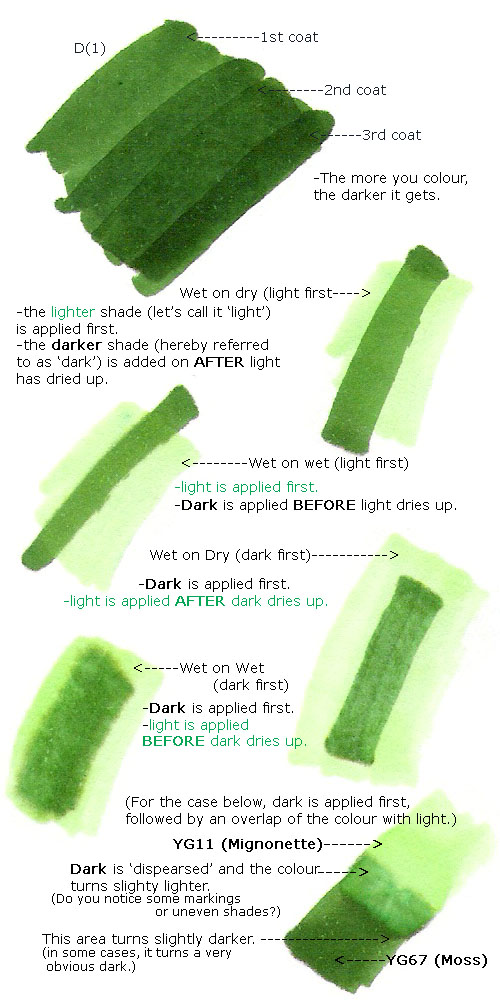
Copic works in layers. You can colour with just one marker and it can give you different shades. (around 3) This can be achieved by building layers, one over the other. The more the layers, the darker the colour will become. (And the more saturated your paper will be. So remember to put some unwanted paper or cardboard behind the picture you wanna colour, or else--)
[The next 4 diagrams]
These are just the basic applications of copic. Look closely at the diagram (I didn't resize it.)
I'm not going to describe the effect, because it's rather obvious with the diagrams. When you colour your drawing, these are some of the basic techniques you can apply. You can complete a drawing with one technique, or you can mix around(that's what I always do).
Eg: Using whichever wet on wet technique first, followed by another random wet on dry technique, or vice versa.
Note that the ink can get quite uncontrolleable someimes, (especially when you're dealing with wet on wet/ your marker is new/ you're new to the marker) so plan a bit before you colour. You can try using colour pencils to mark out the areas you want to colour the darker colours or you can photocopy a copy of your art and do the planning on that. (For me, I'm lazy to plan, so I always use the paler coloured marker to fill in the spaces I want to colour my dark colours with first.)
**And one more thing. I know that COPIC is really expensive and hard to get. The techniques above may cost you quite a lot of ink on one piece of drawing, but throw that "not enough" or "I must save up some more ink for my other drawings" thought away. If you want your drawings to be nice to look at, you have to risk a bit and explore. If this way is not right, try another way, until you get the style and effect you want!! Know that there's no right or wrong way to use these markers.
Colourless Blender (0)
I'm not very sure how to use this one. Normally, use it to blend the paler shades to the white areas of the paper. In some books I've read, the colourless blender is applied on the paper before applying the colour (using the wet on wet technique.) In some others, I observed that they apply the blender after applying the main colour, but that produced some sort of negative effect. There'll be some marks or uneven shades on your colouring (refer to the last diagram) and I won't recommend you to use that on large colouring areas. (Unless for some reasons...)
What is YG11 and YG67?
That's the colour classification number for the marker.
YG stands for Yellow Green.
There are BV, B, BG, RV, R, YR, Y, YG and some more. (B stands for blue, V for Violet, R for red etc) Normally, I don't really care about the number, because the colour is all I want....hehe. But the 'BV, YG' part of the classification will help a lot if you are trying to find colours that will fit a blend you want.
And believe in nothing I've said. Go and try out the markers and write the rules for yourself.
If you think I missed out something (please don't ask about the spray gun thing, I don't have one ;_; and I have no experience with it...), wrote something incorrect or found some interesting things, you're welcomed to leave a comment. :)
Okiee....as requested by Darkraven, here's just a brief explanation on colouring with COPIC...(I won't call this a good tutorial....) For those who had used COPIC before, you can just press back and look at some other stuff....;3 By the way, for those new to Copic, I suggest that you try out the markers first BEFORE reading the following. It'll help even more. ;)
*Everything said here might not be entirely correct, so feel free to drop a comment and correct me. ^^ And I can never garuantee that you'll be colouring like CLAMP or Arina Tanemura after reading this, because everything depends on you and your efforts also!! These are just guidelines.*
introducing copic:
It is an alcohol based marker, so the ink dries up pretty fast after it is applied. (Zzzzzz.....) If you want to get an even coat, you have to colour before the ink dries up.
(Tip: Use the brush nib and colour the entire patch with just a stroke. It sort of prevents some blotches, but don't colour it too fast, or some uneven shades or edges will appear, especially when your marker is running low on ink. If the area you wanna colour is very big, then that'll be another story. XD)
Buying and choosing
When I first started off, I didn't know which colour to choose (because there are so many!!) so I grabbed a few colours which I found eye-catching and nice. Somehow, I had trouble using them later because they don't match and blend with the other colours. In fact, I seldom use them. The ones that I really use are those that are pale and lighter in shades. (eg: warm gray no.1, powder blue) They are the ones which I often need refills for and the ones which blend the darker colours together. (But without the darker colours and midtones, I can't blend them together...)
So now, I buy 3 markers at a time. These 3 are from the same colour group, one is darker, one is the lighter colour and one is in between the other 2 colours (which I call the midtone).
[Refer to 1st diagram]
Copic works in layers. You can colour with just one marker and it can give you different shades. (around 3) This can be achieved by building layers, one over the other. The more the layers, the darker the colour will become. (And the more saturated your paper will be. So remember to put some unwanted paper or cardboard behind the picture you wanna colour, or else--)
[The next 4 diagrams]
These are just the basic applications of copic. Look closely at the diagram (I didn't resize it.)
I'm not going to describe the effect, because it's rather obvious with the diagrams. When you colour your drawing, these are some of the basic techniques you can apply. You can complete a drawing with one technique, or you can mix around(that's what I always do).
Eg: Using whichever wet on wet technique first, followed by another random wet on dry technique, or vice versa.
Note that the ink can get quite uncontrolleable someimes, (especially when you're dealing with wet on wet/ your marker is new/ you're new to the marker) so plan a bit before you colour. You can try using colour pencils to mark out the areas you want to colour the darker colours or you can photocopy a copy of your art and do the planning on that. (For me, I'm lazy to plan, so I always use the paler coloured marker to fill in the spaces I want to colour my dark colours with first.)
**And one more thing. I know that COPIC is really expensive and hard to get. The techniques above may cost you quite a lot of ink on one piece of drawing, but throw that "not enough" or "I must save up some more ink for my other drawings" thought away. If you want your drawings to be nice to look at, you have to risk a bit and explore. If this way is not right, try another way, until you get the style and effect you want!! Know that there's no right or wrong way to use these markers.
Colourless Blender (0)
I'm not very sure how to use this one. Normally, use it to blend the paler shades to the white areas of the paper. In some books I've read, the colourless blender is applied on the paper before applying the colour (using the wet on wet technique.) In some others, I observed that they apply the blender after applying the main colour, but that produced some sort of negative effect. There'll be some marks or uneven shades on your colouring (refer to the last diagram) and I won't recommend you to use that on large colouring areas. (Unless for some reasons...)
What is YG11 and YG67?
That's the colour classification number for the marker.
YG stands for Yellow Green.
There are BV, B, BG, RV, R, YR, Y, YG and some more. (B stands for blue, V for Violet, R for red etc) Normally, I don't really care about the number, because the colour is all I want....hehe. But the 'BV, YG' part of the classification will help a lot if you are trying to find colours that will fit a blend you want.
And believe in nothing I've said. Go and try out the markers and write the rules for yourself.
If you think I missed out something (please don't ask about the spray gun thing, I don't have one ;_; and I have no experience with it...), wrote something incorrect or found some interesting things, you're welcomed to leave a comment. :)
General Info
General Info
Ratings
Category Tutorials » Technique/Media Tutorials
Date Submitted
Views 6023
Favorites... 13
Vote Score 1
Category Tutorials » Technique/Media Tutorials
Date Submitted
Views 6023
Favorites... 13
Vote Score 1
Comments
19
Media Unspecified
Time Taken
Reference
Media Unspecified
Time Taken
Reference
Comments
You are not authorized to comment here. Your must be registered and logged in to comment
nothingempire on September 7, 2008, 9:53:44 PM
 wow....interesting techniques :D thanks!!!!
WaniSaffyaVectora on June 29, 2006, 8:50:58 AM
 I've been using Copic Markers for about 4-5 months, and I love them! I've only just figured out that overlapping the ink darkens the colour, but using a darker colour with the blender does help a bit. Damn shame they're so expensive, I've been looking all over eBay and some sites that ship to the UK for some bargains.
Thanks for the tips.
Len on February 22, 2006, 12:59:58 AM
Len on
So far these are the combos I've tried. ^^; (Really sorry if this isn't helping...T_T) Other combos I've read about are E00 + R11 or E02 or YR02.
Amy_Guardia on February 21, 2006, 5:14:06 PM
Amy_Guardia on
 hey there,I'm using the copic as well but i can't seem to blend the skin colour,if you wouldn't mind,could you tell me the skin colors that's ur using for example I'm using E00,but I dunno which colour to do the shading,pls give me the tip :)ty
Black_Breeze on March 24, 2005, 12:25:18 PM
Black_Breeze on
 OOOHHH. . .
Kagome_and_Kitties_ROCK on February 1, 2005, 6:47:46 AM
Len on January 20, 2005, 7:09:13 PM
Len on
Regarding your question: No, you don't have to apply water. The faint green is actually a different ink colour. (Hmmm...I've never thought of diluting the alcoholic ink before.....sounds interesting ;p)
Side note: Copic ink, when applied and dried, does not disperse when it comes in touch with water (in other words, waterproof). So one do not need to worry about the coloured ink smudging and dispersing when using water-based paints. :)
Black_Breeze on January 19, 2005, 10:59:04 AM
Black_Breeze on
me: I love it when artists make tutorials of coloring. It helps us simple minded people. *points to me*bob: We never knew that copic markers are only available in Asia. I told you we should have stopped by that art store in Japan, BB. . .
me: Anyway, once again an artist had shamefully flamed another artist. I'm sorry, but I really, really hate flamers.
For one, using copic is not a 'common sense thing', especially for a person who never used it before. And tutorials are here to help people, so just accept it. If you already know so much about copic, Mr. Cowell, then why are you reading it? Doesn't that mean you have a lot of time on your hands?
Plus, saying, "youre gay" is gramatically wrong. Please look up the word gay in the dictonary and actually read its meaning.
For crying out loud people, has anyone here read the rules besides me? It's says, NO FLAMES. What does that mean to you?
bob: On a lighter note. . .
me: How can so many people know so many ways to color?! I was like, reading the comments and said, "What?" Hahaha, gosh, I need to get out more.
me: But I'm still confused about something. Do you have to apply water to the copic marker, because on most of the diagrams they all have a faint green around them.
Tedman on January 8, 2005, 3:26:27 AM
Tedman on
 Nice Tutorial Len. I never quite understood Copic pens before. Oh and as for "the Simon Cowell of Art", shut up basterd. I'll bet you couldn't do half as good as LEn does. There's barely room for one Simon Cowell on this planet. Go somewhere else and be lie...the Paula Abdul of Art..or something and be nice. Oh and Magical Moonstone, COPIC are only available in Asia, unless they come over for a comic/anime convention like Anme North...check it out.